Getting started with NubOps
This tutorial focuses on the main steps on how to start using NubOps. These steps are:
- Sign up and login to NubOps
- Load the built-in Demo project in NubOps to see an example of how everything works
- Retrieve data from your Azure subscription(s) either using:
- a Entra ID work account or
- an Entra ID App Registration
Signing up and logging in
There are two options for signing up. The first option is to use an email address. The second is to sign up using a Microsoft Work account. The work account option utilizes Microsofts native authentication mechanism which is the same as is used when authenticating to any Microsoft service, such as the Azure portal or Office 365. This means that if you’re already logged in to a Microsoft service then you’ll be able to seamlessly log in to NubOps. Just select the Microsoft Work account that you want to log in with from the list that appears once you click on the “Microsoft Work or School Account” button.

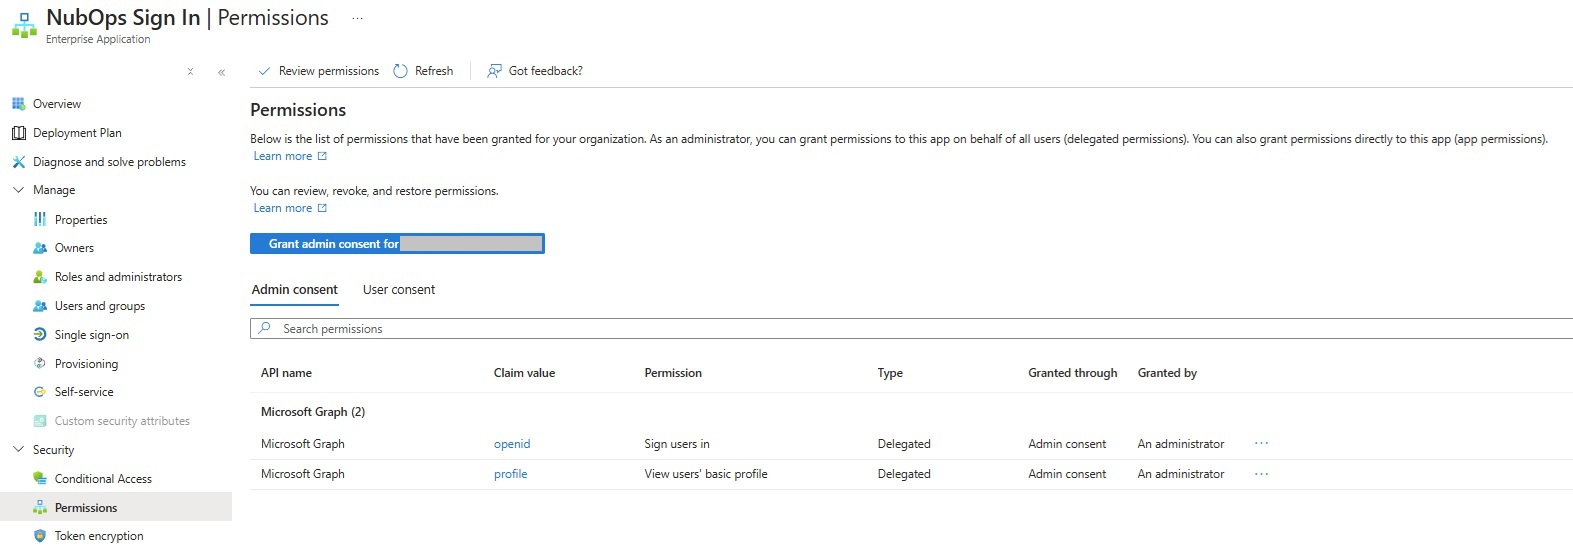
The “NubOps Sign In” Enterprise Application has to be registrered in your Entra ID to enable authentication using a Microsoft work account. This requires giving consent to this Enterprise Application to access your Entra ID. This may very well have to be done by someone who has administrator privileges in your Entra ID tenant.
There is a security related setting for ‘Enterprise Applications’ in Entra ID called ‘User consent settings’, which affect if it will be possible for you to issue consent or not. The three options are:
- Allow user consent for apps. This is the least secure setting as it enables users to give consent for any app to access Entra ID.
- Allow user consent for apps from verified publishers. This is a more secure setting as it enables user to give consent for apps that have been verified by Microsoft.
- Do not allow user consent. This is the most secure setting as it requires that an admin issues consent on behalf of the organization.
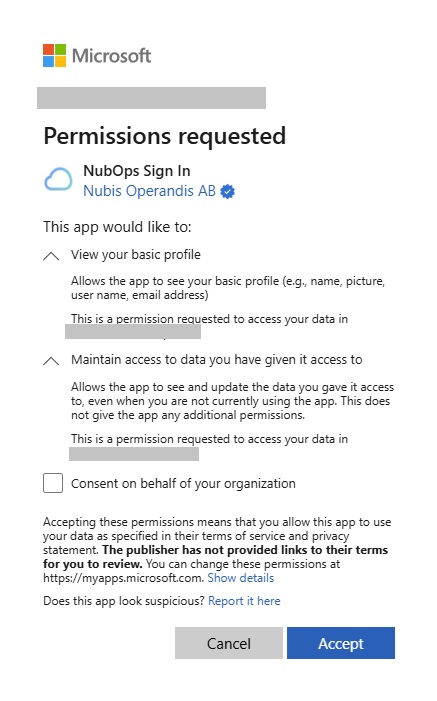
Clicking on ‘Accept’ will issue user consent and will assign the following delegated Microsoft Graph API permissions to the “NubOps Sign In” enterprise application:
- Sign users in (claim value: openid)
- View users’ basic profile (claim value: profile)
Once you’ve signed up using either one of the two options you will need to keep logging in using that same option. Otherwise you will sign up again and create a second account in NubOps.
Accessing the Demo environment
Once you have logged in you won’t see any information at first since NubOps needs to read data from a Azure tenant. Because of this we’ve created a Demo environment so that it’s possible to try NubOps without having to use it on your own environment. The Demo environment contains a number of Azure resources, of which many have configuration issues so that you can see how the audit feature works. To have a look at the Demo environment you first need to load the cloud data for the Demo environment. Follow these steps to access it:
- Log in to NubOps and click on “NubOps Demo” in the top right corner
- Click on “Set current” to enable the NubOps Demo project
- Select “Create snapshot”
- The Demo environment data should take less than 30 seconds to load. Click “Dive in” once it’s done
- Close the projects window and you should now see information in the Overview feature similar to the image below

The Demo environment is accessible for everyone who has signed up. This makes it possible to have a look at Azure architectures in the Diagrams feature. Click on a resource, such as a VM or Vnet, and choose “Open Diagram” to see the customized archtiecture diagrams that are based on how resources have been configured.
Providing access to your subscription(s) using your Microsoft work account
To retrieve data using your own Microsoft work account, you’ll have to issue consent to the “NubOps Azure Connector” Enterprise Application so that it can be registered in your Entra ID. This might also require an admin to issue consent on behalf of the oganization, as mentioned previsously regarding signing in with a Microsoft work account.
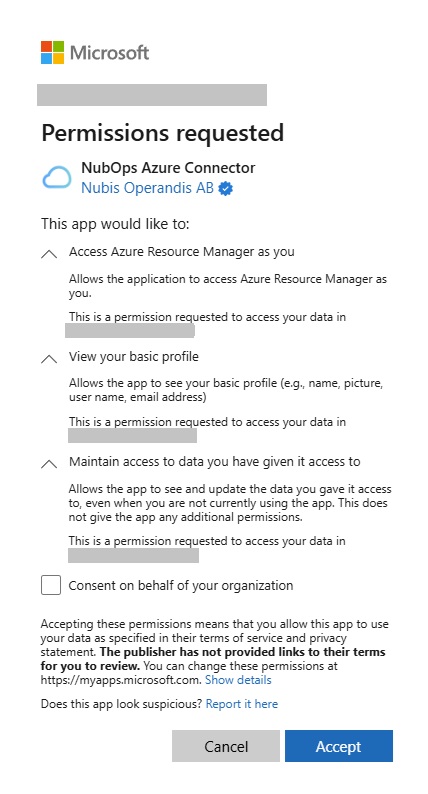
Clicking on ‘Accept’ will issue consent, which will assign the following delegated Microsoft Graph API permissions to the “NubOps Azure Connector” Enterprise Application:
- Sign users in (claim value: openid)
- View users’ basic profile (claim value: profile)
- Maintain access to data you have given it access to (claim value: offline_access)
The “Maintain access” permission is used to receive refresh tokens from the Microsoft identity platform token endpoint each time you want to create a new snapshot. No authentication related information is stored in NubOps so re-authentication is required with each snapshot.
Providing access to your subscription(s) using an Entra ID App Registration
An app registration can be used to retrieve data from your environment. You need to enter three values in the “Enter credentials” window in NubOps in order to analyze your Azure information. The values in question are:
- A "Tenant ID"
- A "Client ID"
- A "Client secret"
The App Registration needs the following role assigned to in on one or more subscriptions in Azure:
- Reader role
Only assign the App Registration Reader role on the Azure subscription(s) that you want NubOps to analyse. Our recommendation is to start with an isolated Azure subscription that you use as a sandbox or for Proof-of-Concepts.
The basic steps on how to set up everything are:
- Find your “Tenant ID” in Entra ID
- Create an App Registration in your Entra ID tenant to get the “Client ID” and “Client Secret” values
- Assign the “Reader” role to the App Registration in Azure IAM for the subscription(s) that you want to analyse
- Create a new project and enter the App Registration information into NubOps to create a new snapshot
Step 1. Find your Tenant ID
The first value is the tenant ID and this value is shown in the Entra ID service in the Azure portal.

Step 2. Creating an App Registration in Entra ID
Follow these steps to create an App Registration in Entra ID and get the “Client ID” and “Client secret” values:
- Select “App Registrations” in the Entra ID service and click on “+ New registration”.

- Enter a name for the App Registration
- Make sure the “Accounts in this organizational directory only” option is selected and click on the “Register” button

- Take note of the “Application (client) ID” value once the app registration is registered. This is the “Client ID” that you must use in NubOps.

- Select the “Certificates & secrets” blade
- Click on “+ New client secret”, give the secret a name and then add it.
- Click on the “Copy to clipboard” icon before you leave the “Certificates & secrets” blade. This is the only opportunity you have to save the actual value of the “Client secret”. Only store this value in a secured location as it needs at least the same level of protection as your personal passwords.

- You should now have the three necessary values, i.e. the “Tenant ID”, the “Client ID” and the “Client secret”.
Step 3. Assigning a role to the App Registration in Azure IAM
Once the App Registration has been created it’s necessary to assign read access to one or more Azure subscriptions.
We recommend that you start using NubOps with a sandbox subscription or a subscription that is used for non-production purposes only.
Follow these steps to assign a role:
- Log in to the Azure portal
- Select “Subscriptions” and choose the subscription that you want to give NubOps access to
- Select the “Access control (IAM)” blade

- Click on “Role assignments”
- Click on “+ Add” and select “Add role assignments”
- Select the “Reader” role and click on “Next”
- Click on “+ Select members”
- Search for the App Registration that you created previously and click on “Select”

- Click on “Review + assign” and assign the role. You should now see that the role has been assigned

Step 4. Creating a snapshot for the first time
Follow these steps to analyze your own Azure environment:
- Open the projects window at the top right in NubOps.
- Click on “Create new project”.
- Choose between using your Microsoft work account, or an App registration, to collect data.
- Using your Microsoft work account will then prompt you to select a tenant, and at least one subscription that you have access to.
- Using an App registration will prompt you to fill in the Tenant ID, Client ID and Client secret.
- Verify the connection to make sure the permissions have been configured correctly.
- Select at least one subscription to analyze.
- Click on “Create snapshot” and you should see a green checkmark if everything went well. Please provide a bug report to us regarding any technical problems that you encounter.
- Click on “Next” and provide a name to create the project.
- Click on “Close” and then you’re ready to start using NubOps.
Depending on how many subscriptions you want to analyse, and the number of resources in each subscription, it will take longer time to retrieve all data. If it takes too long you can remove the app registration from one or more subscriptions until it takes an acceptable amount of time according to your personal preferences on how long you want to have to wait.
If there is any issue with the tenant ID, client ID or client secret then you will get an error message. That error message is what NubOps gets from Azure when trying to verify that the information is correct and can be used for authentication purposes.
Additional information regarding App Registrations is available on Microsofts web site here: Use the portal to create an Entra ID application and service principal that can access resources